Retro Apron

8 Jul

I love retro style aprons, especially cute skirt aprons!

This skirt apron is made with two different floral fabrics, a pleated bottom, a zigzag stitch detail and a cute little pocket.

This, like all my sewing items is available to buy! It is €30 plus package and posting.

You may choose the colour of the fabric but any extra modifications are an extra €5 per modification.

Mead, the Monks Brew

3 Jul

I love home brewing! It is so exciting, collecting your ingredients and waiting for the outcome. Making mead has been an ambition of main for a long time now and I finally got my act together last month.

I got this recipe from my friend Benny the bee keeper. Benny is now in his 80’s and uses an ancient recipe created by monks. It is super easy and has a great outcome. For this recipe I used some of my grandfather’s honey. My grandfather keeps his bees in the Wicklow Mountains where I live and the honey is just unbelievable. It is important to eat honey from where you live as it is believed to help hay fever and anything to do with your breathing such as asthma. This is because the bees take their pollen from your surroundings.

Note for Brewing

Brewer’s yeast, yeast nutrient tablets and wine bottles can all be bought from home brewing and winery stores.

The finished product

Prepare the mead in summer which is best for fermentation.

Make sure to add yeast nutrient tablets, otherwise the yeast will feed on the honey and cause bitter mead.

Recipe

Simple recipe for homemade mead

1.8kg/4lbs Good quality honey

3.7 litres Rain water

28g/1oz Hops

28g/1oz Brewer’s yeast

2-6 Yeast nutrient tablets

1. Collect rain water and filter through muslin.

2. Place the rain water and honey into a large container and stir until dissolved.

3. Add 1oz of hops to the honey water.

4. Using a large pot, bring the honey water to the boil and remove from the heat. Only allow the mixture to reach boil, do not over boil or else the mead will become bitter.

5. Using a wooden spoon, remove any scrum which has risen to the top.

6. Allow the mixture to cool and add the brewer’s yeast. If the yeast is added when the honey water is too hot it will kill the yeast.

7. Pour the honey water into a large sterilised container such as a clean unused bin or any large clean plastic container.

8. Crush between two to six yeast nutrient tablets. For medium mead use four tablets.

9. Use a minimum of two tablets for a dry mead or a maximum of six tablets for a very sweet mead.

10. Place two sheets of muslin over the container to prevent anything from entering and contaminating the mead but also allowing air to enter.

11. The mixture will begin to ferment and bubble, this will happen for 3-5 days, once the mixture has stopped bubbling vigorously it can be bottled.

12. Filter the mixture through two sheets of muslin and pour into sterilsed resealable wine bottles.

13. Leave the mead to ferment for a month before opening and enjoying.

Vintage with a Twist

3 Jul

I love vintage handbags! This is one I made but I used modern style fabrics using a black and white polka dot and a deep red. I then finished it off with cute stripped and polka dot buttons. This little handbag is perfect as an evening bag, it is the perfect size for your phone, purse and still has enough space for some essential make up. The handle sits comfortably on your wrist so you hands are free.

Dimensions

The handle is 17cm
The bag is 18cm in height
and at its widest part 22cm

The inside of the back is fully lined with a black and white polka dot fabric.

Change of colour is free but any extra modifications are 5 euro per modification. Just email me on chatcountrychick@gmail.com to arrange details.

To buy this page just go to cart on the top left side of my blog 🙂

Elder Flower Champagne

1 Jul

Elder flower is strongly connected to Irish legend and medicine. The elder tree is often connected with bad luck and is host to the mischievous tricks of the fairies. The elder flower and leaves are thought to have a mild narcotic effect, Irish folklore warns of sleeping under the elder, for fear you may never wake again.  Legend also claims that if an old maiden is to wash her face in the dew of elderflowers, she will retrieve her youthful beauty.

Making champagne out of elder flowers is so simple! All you need is a large sauce pan and some bottles. Elder flower is light with only 1.5% alcohol. The elder flower gives this sparkling drink a  beautiful lemon scent and taste. I also added some rhubarb cordial to some of my brew to make a pink champagne.

Recipe 

For 4.5 litres of champagne you will need-

6 freshly picked elder flower heads

Two Lemons

One Orange

750 grams of sugar

Equipment 

You will need several bottles before you begin. I got special home brew bottles that have two layers of plastic in them. It is better to use plastic bottles instead of glass as plastic bottles won’t explode from too much pressure. You will also need some muslin cloth for straining the champagne, the muslin will remove all the petals from the elder flower.

Method

  1. Take a large sauce pan, add the 4.5 litres of water, the elder flower heads and sliced orange and lemons. Cover, and leave over night.
  2. The next day, strain the water through muslin cloth.
  3. Place the water into a large clean bucket or back into the sauce pan. Add the 750g of sugar and stir until it dissolves.
  4. Bottle the champagne. Over the next few days it will begin to ferment as the wild yeast from the flower feeds on the sugar. Wait for one month before drinking the champagne.


Eating the Stinging Nettle

1 Jul

The aggressive but humble nettle has been used since the Bronze Age for food, medicine, fibre and dyes.  Nettles have countless nutritional benefits due to the high levels of vitamins, minerals and protein along with aiding hay fever, asthma, colds and blood clotting.

Nettles always grow in the same places each year and should be gathered in spring before they flower and can also be gathered in autumn as fresh ones appear.

Some expert foragers have discovered ways of grasping nettles without being stung.  However for the less fearless, the best method is to use the rubber gloves or a plastic bag and scissors. 

The younger leaves are the best part of the plant. They come off most easily if stripped from the top down.  Ideally pick a large quantity of nettles and freeze some for use during the winter.

Nettles should be picked from areas away from roads and animals to prevent any contamination.  Clean and chop nettles using rubber gloves, once the nettles have been cooked slightly the stingers are deactivated. The needles will be destroyed by cooking, steeping, or drying, but not by freeze-drying or juicing.

If over cooked, nettles may develop a bitter taste.  Nettles are often boiled which is the worst way to cook the leaves.  If making a nettle soup the leaves are to only be simmered for 5-10 minutes, any other method is better suited such as frying or using in a baked dish. Any recipe involving spinach can be replaced with nettles.

Nettle and Walnut Pest

A large bunch of nettles/spinach

1 tablespoon of olive oil

75g Walnuts

1 Garlic clove

150ml Extra virgin olive oil

50g Mature Balllintubber chedder with chives

Juice of ½ a lemon

Pinch of sea salt

Freshly ground pepper

  1. Place a tablespoon of oil into a frying pans, add the nettles and fry until reduced in size.  This will destroy the stinging hairs.
  2. Place the nettles, walnut and garlic into a food processor or blender and pulse into coarse grains.
  3. Gradually add the extra virgin olive oil in a steady stream until a thick grainy paste has been created.
  4. Scrape the mixture into a bowl.  Add the cheese and lemon and adjust the seasoning to taste.

Nettle and Potato Gratin

A large bunch of nettles/spinach

8 Medium sized potatoes

A knob of butter

1 tablespoon Olive oil

2 Onions finely chopped

2 Garlic cloves

250ml Cream

100ml Vegetable stock

Sea salt

Freshly ground pepper

For the topping:

4 Slices stale bread

50g Walnuts, hazel nuts or pine nuts

25g Melted butter

50g Mature cheddar

  1. Peel and boil potatoes for ten minutes until half cooked, strain, allow to cool and cut into thin slices.
  2. Heat the oil and butter in a frying pan.  Add the chopped garlic and onions and cook until soft.  Poor the cream and vegetable stock into the frying pan and simmer gently until reduced to half its size.  Add the nettles and cook until the nettles have reduced in volume.
  3. Layer the potatoes into an oven dish and pour the cream sauce and nettles over each layer of potatoes.

For the topping:

  1. Break up the four slices of bread and gradually add to a food processor.
  2. Add the walnuts, cheese and melted butter to the food processor.
  3. Place the breadcrumbs evenly over the gratin and place into a preheated oven of 190o C/ Gas mark 5 and bake for 30 minutes.

…..ends

Fried Garlic Nettles

A large bunch of nettles/ spinach

3 Garlic cloves

2 rashers

A knob of butter

1 tablespoon of olive oil

Sea salt

Freshly ground butter

  1. Place butter and oil into frying pan.
  2. Cut rashers into small pieces and add to frying pan along with slices of garlic.
  3. Add sea salt and pepper.
  4. Add nettles and fry until reduced in size.
  1. Serve immediately as a side or allow to cool for a salad.

My Ginger Bread House Fantasy

1 Jul

Ginger bread houses have always been a fascination of mine, from fairy tales of Hansel and Gretel to the sheer skills needed for it simply to work.

As a child I would watch my grandmother bake cakes, buns and tarts. She would often let me make ginger bread men with an old red cookie cutter and the left-over pastry from her apple tarts. So, after years of curiosity and built up childhood dreams, I decided to embark on my own journey of baking and decorating a ginger bread house, with one exception.

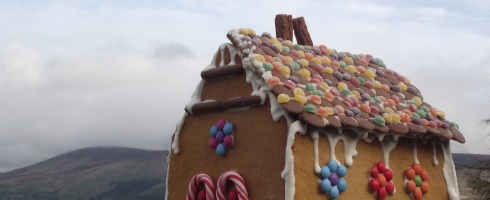
This cakey house was not going to be the normal cabin-like ginger bread house but instead based upon my grandparents’ 160-year-old farm house.

Making a ginger bread house is the perfect project for the entire family. Between the skills of baking, constructing and decorating, everyone can take part in the process.

It can be eaten straight away and is edible for a whole week after it has been baked.

If you do not want to eat the house, it can be kept as a decorative piece for over four weeks.

Ginger bread recipe

1lb/450g butter

8oz/ 225g of dark brown sugar

12oz/ 340g of Golden Syrup for golden ginger bread or treacle can be used for a darker biscuit

2 lb 5 oz/ 1,050g plain flour

3 tsp bicarbonate of soda

4 tsp ground ginger

Dimensions

Roof

28cm x 17cm

Front and back of house

28cm x 22cm

Sides of house

3cm x 22cm

Guide for ginger bread house

I suggest making the ginger bread in the evening. If you leave the ginger bread overnight before constructing the house, the pieces will be nice and sturdy and less likely to break.

This dough recipe is quite large but it will allow you extra dough for making ginger bread men and other pieces.

Making the gingerbread dough

1. Measure the butter, sugar and golden syrup or treacle and melt in a large saucepan at a low heat. Once the sugar and syrup are dissolved, remove from the heat. It is important not to continue cooking the syrup mixture after it has fully dissolved as it will turn into a hard toffee.

2. In a large mixing bowl, sieve the flour, bicarbonate of soda and ground ginger.

3. Add the melted syrup mixture, combine and knead the dough until it comes together.

4. The amount of dough is quite large, so divide the dough in two and flatten onto a plate in a round and flat ginger biscuit shape, cover in cling film and place into the fridge for 30 minutes to one hour to allow to rest.

Making templates for the roof and walls

1. While the ginger bread dough is resting, make templates for the walls and roof.

2. Using the dimensions given, map out the three shapes on paper. If you want to change the shape of the house or make it smaller, follow the basic structure given and make sure that all the walls and the roof are a suitable size for each other.

3. Be adventurous with your design, you can base it on your own home, add a porch or even make a little tower or chimney.

4. After making the templates, cut out rectangle pieces of grease-proof paper that are large enough to accommodate the templates.

Rolling out the dough

1. Preheat the oven at 180oC (350oF).

2. Place a light dusting of flour on a piece of grease-proof paper and the rolling pin, take a large piece of dough and begin rolling in smooth sweeps, lengthways and sideways.

3. The reason for rolling the dough on the greaseproof paper is so it is transportable to the oven tray. Make sure to do this, otherwise it will be almost impossible to transport the dough.

4. At first, the dough may seem crumbly but don’t worry, after rolling it will quickly combine in a smooth golden sheet of ginger bread.

5. Roll until the dough is even and 1cm thick.

6. Place the template over the piece of dough and trim with a sharp knife to the correct size and shape.

7. Using two sets of hands, take the grease-proof paper from each corner and transport to an oven tray.

8. Repeat this process for each part of the house.

9. Use any extra dough to cut out some ginger bread people, Christmas trees and any other accessories.

10. If your pieces are large like mine, you will have to bake the ginger bread in two lots.

11. Place the ginger bread in the oven for 12-15 minutes until golden brown.

12. Allow a few minutes to rest before using the grease-proof paper to transport the ginger bread to a wire cooling rack.

13. Leave until the ginger bread if fully cooled before icing. For best results, leave overnight to rest, this will hugely minimise any chances of the gingerbread breaking during handling.

Cement

1. Sieve the 9oz/ 250g icing sugar into a large bowl and combine the three egg whites.

2. This will form a thick white paste. Make sure that the paste is not too wet, it will still glue the pieces together, but it will dry in a clear white rather than a thick snowy icing.

3. Place a damp cloth over the icing bowl while not in use, otherwise it will begin to dry out.

4. This icing can be placed into an icing bag, or simply use a palette knife to spread the thick icing.

Construction

Constructing the house is the only slightly difficult step to making a ginger bread house, but if anything does go wrong, it can easily be mended or replaced. Before beginning to construct the house, have cans and jars on stand-by to place beside the walls for support as it dries.

1. Begin by placing a line of icing underneath where the first piece will go.

2. Ice the vertical sides of the wall. At this point, don’t ice where the roof is going to attach as you won’t place the roof until much later.

3. With a thick layer of icing, glue all four walls together and surround by cans and jars to keep them standing upright as they dry.

4. Wait for 30 minutes or until the glue is fully dry before adding the roof.

5. If any of the pieces crack or snap during this process, simply glue them back together. Decoration will hide any mistakes made during this stage. Don’t let any breakage upset the project, everything can be fixed or even replaced with a bricked wall of ginger bread biscuits.

6. While placing the roof on my ginger bread house, I began to worry that it would not be supported fully in the centre. To solve this, I placed wooden skewers like rafters across to the two triangle shaped sides of the home.

7. This involved very little effort, I simply used the sharp end of the skewer to poke off the tiny piece of ginger bread for the skewer to sit on the roof. This is only necessary if you are making a large roof or are worried that you may have rolled the roof too thin.

8. Add plenty of glue to the sides of the house supporting the roof. Place both pieces on top and again, place cans and jars underneath the overhang of the roof to stop it from sliding down.

9. Again, allow the glue to fully dry before attempting to decorate the house.

Extras

During this time, ginger bread people and Christmas trees can be decorated. Little tubes of coloured icing can be purchased or the gluing ice from the ginger bread house can be used to attach Jelly Tots, Smarties, liquorice and any other sweet imaginable. A little bit of food colouring can be added to a small amount of the glue icing for decorating. Be creative, maybe attach two lollipops to the ginger bread man’s feet and two chocolate fingers to his hands so your little ginger bread person can be skiing. I chose to make a little Hansel and Gretel to stand outside my house using icing from a tube.

Decorate

Once the ginger bread house glue has fully set, it is time to decorate.

1. The best place to begin decorating is the roof. If you are layering the roof in buttons or biscuits, it is good to do it in sections; otherwise the weight of the sweets will cause everything to begin to slip down the roof.

2. If you are using buttons or biscuits, place a layer of glue across the bottom of either sides of the roof and place a line of buttons or biscuits. Decorate another piece of the house until this has dried and then add another layer. Continue this process until the roof is fully covered.

3. Anything can be used to cover the roof, including simply placing a layer of gluing icing to look like snow or place a layer ofcoconut over the icing to make fluffy snow. If you wish to continue the theme I chose of old Irish houses, a thatched cottage can be made by using noodles, pasta or even just using the real thing by using some straw or reed.

4. To make a chimney, glue four biscuits together or use half a flake bar and simply glue to the roof.

5. For decorating the rest of the house, use a combination of colourful sweets, biscuits, candy canes and lollipops.

6. I used Smarties for the windows to create a stainless glass effect. Alternatively windows can be drawn with icing sugar or glue one single large jelly sweet.

7. Use extra glue icing to make a garden of snow. Place the ginger bread men, Christmas trees, and lollipops into the snowy icing before it begins to dry. You can also make a little garden wall out of brick layered biscuits and icing.

The smell of this sweet ginger bread centre piece will fill your home and you can eat it or keep it. The ginger bread house can be kept for a week before going stale, but that is if you want to eat it. Otherwise, it can be kept for four weeks as a decorative piece. Once you are finished with the decorative piece, remove all the sweets and put outdoors for the birds to eat, or if you are like me, feed it all to the pigs.

Autumn Doll

1 Jul

Autumn is my favourite time of year; I just love it, the smell, falling leaves and the mild but slightly chilly weather. I know it is still summer but I am excited for when autumn makes its appearance in August.  While roaming around my craft room I came across this doll. I have made a lot of dolls over the years but this one is by far my favourite.

My doll inspire by a John Keats poem

I never really named her but she is inspired by John Keat’s poem Autumn. Her fabric skin is lightly dyed using tea bags and decorated with beads and simple twig like embroidery. Her hair is made from wool which I think looks like beautiful blonde locks. I kept her face simple and used stitching of different reds and golds to give her a masquerade mask. I gave her some simple wire jewellery around her neck and her dress is made from fabric which remind me of rich red autumn leaves.

This doll can be purchased!

The exact same doll can be purchased or I can change  the colour of her hair, dress and skin. Any extra details will be at an extra charge of €5.00 per modification.

My dolls are made from the finest quality materials. The doll is 42 cms in length and the stuffing is anti-allergic filling. My sewing room is also in a non-smoking and pet free home.

It will take about 2 weeks to create your doll from the moment you purchase.

Once you buy an autumn doll, remember to send me an e-mail along with any details:

  • Hair colour
  • The colour of the dress fabric and mask
  • Skin colour
  • And also if you have any particular requests

Once we arrange all the details, I will start creating your doll. I will send you photos of the doll prior to shipping.

To Purchase the Autumn Doll, Just visit the cart section of the site 🙂

Thank you for looking!